Saturday 28 September 2013

Behind The Scenes: 29th May 2013 - "Night at the Whiskey Jar"

I did this photo shoot a long time ago (as you can tell from the date) but as usual I am not very consistent at blogging!

This was another shoot for the J'adore Vintage girls and this time it is totally opposite to the last one I showed you. 
The theme of the shoot was androgynous and we wanted it to show the progression of the model's night out, as the name suggests (kind of). It was shot in a bar in Manchester's Northern Quarter called  "The Whiskey Jar" and it's the perfect setting if I'm honest. 
If you are a fan of Britain and Ireland's next top model, then I'm sure you will recognise the model, her name is Jennifer Joint. 
We did 3 looks for this shoot along with 3 outfits. 


Look 1

This look is supposed to be the beginning of the night so it's very demure, with not much going on. 

On the skin, I used MAC's Face and Body Foundation all over, then for more coverage around the centre I used Bourjois Healthy Mix Serum . For concealer I used MAC studio finish concealer and the Bobbi Brown creamy concealer. 
This was finished with a dusting of MAC prep + prime translucent powder through the centre of the face. 
On her cheeks I didn't want any colour, so I just used MAC Harmony blush as a contour shade. 

When you think of androgynous, you think of heavy brows, so I just filled hers in with a bit of eyeshadow. To be honest her brows were pretty thick so I didn't need to use much. I also applied a tiny bit of highlight under the brow. 

On the lips I used Currant lip liner and Hang up lipstick, both from MAC. This went with the jacket pretty darn well! 


Look 2 

The second look is representative of the part of the night when you're the life and soul of the party, hence the musical instruments and sequins! 

For this simple, black smokey eye I started with the Bourjois Kohl liner all over the lid as a base and smudged into the water line. 
This liner is literally my FAVE kohl liner ever it is so good! 
Then on top, I applied Carbon from MAC and blended out. 

On the lips we took off the dark lip because we wanted something more fun so I used Cherry lip pencil from MAC and then topped it off with Bourjois Sweet Kiss Lipstick in Rouge Fashion. 


Look 3

The third and final look is basically exactly the same as the previous one. Except this time on the lid I applied a cream eyeshadow by NARS called Zardoz over the top of the shadow. 
 
It creases a lot, which normally is a nightmare, but for this part I wanted it to crease because this part of the shoot was about the end of the night when you've had too much to drink and can hardly move. 

It's not hugely visible on this image unless you zoom in, but I know it's there and that's all that counts! 

I think the cigar makes the image! 


This photo is the last one we took and I think it is my favourite. Don't ask me why because I have no idea, but I love it! (Lipstick is purposely smeared!) 
We love an empty bottle of Jack Daniels! 


And now for some behind the scenes.... 

sometimes trousers can me quite small for a model's sky high legs... they need a bit of assistance with shoe tying! 
A quick makeup snap before going on set!

To see the rest of the photos from the shoot, head to facebook.com/LauraGibbMUA

To shop the outfits head to www.jadorevintageclothing.co.uk 
and don't forget to follow the girls on twitter @jadorevintage1 and instagram @jadorevintage1

Photographer: Leah Henson 


Hope you enjoyed!

love xo

Wednesday 26 June 2013

Behind the Scenes - May 18th 2013

I have decided to start doing these posts where I can show you what goes on behind the scenes of photoshoots I've been doing at the moment. I will show you what products I used too....

Photographer: Leah Henson


So, I did a photoshoot for a shop in my village called J'adore Vintage. They are an amazing little boutique-y vintage shop. The have a website too where you can get some amaaaazing clothes (yes the overuse of 'a' was necessary!)

We shot this in a local park. It was supposed to be a retro summer shoot, but of course, it was raining. I think we still made it work though!

The look the stylist wanted was retro, but not a obvious retro if you get what I mean, kind of a 'white trash retro'. So we went for a classic flick and a bright pink lip.

On the girls I used the Bourjois Healthy Mix Serum foundation, along with Mac's Studio Finish concealer to get the perfect base, to contour I used the Bourjois chocolate bronzer and a little bit of MAC's Harmony blush.

On the eyes, I used MAC's paintpot in Bare Study all over the lid which is a gorgeous champagne shade. I then went over it with a bit of MAC's Ricepaper and Urban Decay's Virgin (from the Naked Palette)
Then, using the Naked Palette again, I applied Naked and Buff into the crease and blended it out.

The liner I used was Blacktrack by MAC (I love it when things rhyme!) using an angled brush.
On brows, I just brushed them through with a bit of eyeshadow - nothing major as they both had great brows.


On Sammi (blonde) for her lips, I used a Rimmel Kate Moss lipstick, I can't remember the name, but it's a reddish pink. And on Carmen, I used Lustering from MAC.

And that is pretty much it!

Some behind the scenes now...

Unfortunately I only have one photo from behind the scenes of this shoot, but here it is.
Sometimes, you have to do things to make shoots look more beautiful, especially if the weather is crap! So here is Sam, the stylist and owner of Jadore Vintage, hitting a blossom tree with an umbrella to make it fall.


To shop online at J'adore, head to jadorevintageclothing.co.uk I'm sure you will find some gorgeous clothes and accessories!
Follow the on twitter and instagram @jadorevintage1

To see all the pictures from the shoot, head to facebook.com/LauraGibbMUA

I hope you enjoyed the first post in the series! Let me know what you think!

Don't forget to follow my blog if you're enjoying it!

love xo

Thursday 28 March 2013

Making Your Makeup Last: Volume III

So recently I've been a rubbish blogger.. I think it's been over a month which is ridiculous and I can only apologise! but anyway...

We're finally here! Volume III! Long Lasting Lips (we love a bit of alliteration!)

I tend to find that keeping lipstick on all day is not that difficult, but that's just me... Lip gloss however, is a near impossible task. I rarely wear lipgloss, for the pure reason that I can't be bothered to reapply it 80000 times a day! But we'll give it a go...


Lipcare

It's pretty important to look after your lips because no matter how nice the shade, or however nice the rest of your makeup looks, if your lips are dry and flakey, it will not look good.
At all.
Using a scrub will help eliminate dry chapped lips and leave them baby soft. I use a homemade sugar scrub because it works really well but mainly because it is cheeeeeap! (and yes there are meant to be that many "e's") But anyway, you can always buy one if you prefer.
After exfoliating, you need to moisturise to maintain the 'baby soft-ness'. My favourite is the JASON naturals one (review here).

Liner

Lip liner is the equivalent to primer. I'm sure there are lip primers out there, but liners work just as well or better.
It's a fairly simple process... Just line your lips (obviously!) then fill them in. Simple as that really.. The only thing that is difficult is getting the lines perfect so it might take you a couple of practices!
By filling in the lips, if any of the lipstick wears off, you still have some colour showing through underneath so it doesn't look like you've not washed your makeup off from last night....
Some of my favourites are the Rimmel Exaggerate liners as they are not as drying as some others I have tried.

Lipstick

With lipstick, you want to apply it in thin layers, as with most things in this series...
I would say apply it straight from the tube first, then blot with a tissue. This will take any excess off so the next layer can adhere. Then apply another layer, but this time using a lip brush, just so you can get the line perfect and precise.
Now if I were to suggest a lipstick, we'd be here for hours because there are so many amazing ones out there, you just have to test them yourself.

Lipstain

Now if you're slightly lazy (like me) or just prefer that extra 5 minutes in bed in the morning (like me) then I think a lipstain is best for you as it's quick and lasts all day!
There's not a particular way to apply them I don't think... Lipstains have become a lot more popular over the past few years so pretty much every brand in the drugstore has them. My favourites are the Revlon Just Bitten Kissable Balm Stains as they are really moisturising as well as long lasting.


Lipgloss

I don't think there's any way of keeping lipgloss on for a long period of time.
What you'll usually find, is that the stickier the gloss, the longer it will last. Sticky glosses don't feel that great though, so if you're willing, you can get a nice gloss and just put up with the re-application.


Another alternative to these steps is a fairly new hype going around that is a 'lip creme' sort of thing. YSL do them called "Vernis A Levres" and Rimmel have just brought out the "Apocalips" which I am sure you have heard all the hype about. These are another quick solution to the whole lip thing and they really are amazing!


I hope you enjoyed the final installment! I will try and think of another series to do as this was quite fun!

Hope this helped!

xo

Follow my blog with Bloglovin

Tuesday 12 February 2013

Valentine's/Date Night Tutorial

This is my first tutorial so if it's rubbish I apologise in advance!

I hate how when people do Valentine's Day tutorials, they always use pink eyeshadows - I hate pink eyeshadows because they can make your eyes look puffy. So I have decided to do a look that is just a natural, soft smokey-ness that isn't too over the top so you won't scare off your date (hopefully!) 

This is my friend Alice! This is how I would do her makeup if she ever managed to get a date hahaha... She was my model for the evening and this is the final look.
Nice eh? Not too much but it enhances her eyes and makes her look lovely! (you should have seen her before I put makeup on her! Talk about rough! tehehe)

To start off with, I cleansed and prepped her skin to get it looking its best. I used the Bourjois Healthy Mix Serum foundation because it is lightweight, but it has a nice coverage without looking caked. It also has a nice natural glow and doesn't make you look shiny or greasy...
If you apply it with a duo-fibre brush like the Real Techniques stippling brush, you can get a really nice, almost airbrushed finish.

Next, I applied some concealer mixed with some under eye highlighter (something like the YSL Touche Eclat) under her eyes in a 'v' shape, down the bridge of her nose and a bit on her cupid's bow a la Kim Kardashian. This really highlighted her face.

We'll come back to the rest of the face later. Now for the eyes.

I started by applied MAC paint pot in 'Bare Study' which is a gorgeous iridescent goldy nude colour - I can't really describe it, but believe me, it's nice!

Then I applied a light brown in the crease to use as a blending colour for the next few steps. I applied a shimmery white colour all over the lid. It is 'Bootycall' from the Urban Decay Naked2 palette.

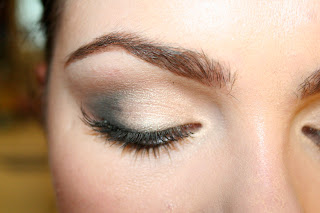
The next colour is one I haven't used before. It's the Bourjois Intense eyeshadow in number 07. It is a kind of grey colour with a slightly brown undertone. SO nice. I just smudged this into the lashline, concentrating on the outer corner and slowly, bit by bit, bringing it into the outer corner of the crease.

You don't want to bring it into the crease too much because we don't want it to look overly smokey so we're concentrating it mainly at the lash line. Then, take that same colour and apply it on the lower lash line using a pencil brush or an angled brow brush, whatever you prefer.

I wanted to define the lash line a little bit more, so I smudged a tiny bit (and I mean tiny) of MAC blacktrack gel liner right into the lashes and blended it into the grey colour. Then I put a bit of black eyeshadow over the top. I didn't bring those into the crease though. You could always add a thicker line and really wing it out 50's style if that's your thing, using the gel liner.
I then filled in her brows just using a brown eyeshadow and a thin angled brush. Alice likes her brows quite thick, but you can do yours however you normally do them.


Then I moved back onto the face. I bronzed and contoured her face using the Chanel 'Bronze Universal', Highlighted using MAC's Cream Colour Base in 'Pearl'. For blush, I started with MAC's cream blush in 'Ladyblush' and then set it using 'Peaches' powder blush (also from MAC) but you can use any peachy pink blush, whatever suits your skin. I set the bronzer with the Bourjois Chocolate bronzer.

Back to the eyes again! Curl your lashes and apply lashings of mascara to the top and bottom lashes. I love the Makeup Forever Smokey Lash, but that's basically impossible to find in the UK, so whatever you favourite voluminous mascara is, use it.

Once that's done, you can highlight the inner corner of the eyes and under the brows. I used Vanilla Pigment from MAC. This stuff is so beautiful, I think Alice wanted me to throw it at her face. It will really help open the eyes and make them look more bambi-esque and innocent, if that's the look you're going for. I also didn't apply any liner on the waterline for the same reason. But if you're the more 'seductive' type then go ahead and apply the liner to the waterline.

I wanted to make the lashes look really fluttery and pretty, so I went with individual lashes, just on the outer corner. It acts almost like a liner as it elongates the eye, but in a really subtle way. I love a good individual lash!

Then I'd go back and just touch up bits of concealer and foundation if they've rubbed off. Then lightly powder down the centre of the face (forehead, nose, under eyes and chin) with a loose powder (or pressed if you prefer)

On the lips, we want to keep on the natural theme by using soft pinks and nudes. (Plus, if there's going to be any sneaky kisses, I'm sure you don't want bright red lipstick everywhere...)
I just used a Rimmel Lip Liner in 'Eastend Snob' and layered it with MAC Lipstick in 'Hue' which in my opinion suits everyone.

Apply a bit of gloss if you fancy and voilĂ ! You're done! 

All ready for your hot date!
Of course this look can be used for many other occasions, not just Valentine's obviously!

Here's a closer look of the eyes... 


I really hope you enjoyed
And I hope you have a good Valentine's Day!

Love Laura

xo

Friday 1 February 2013

Making Your Makeup Last: Volume II

This time, I'm talking EYES. I used to have trouble with creasing eyeshadow and running eyeliner, as I'm sure most of us have, but these simple steps have helped get rid of these problems...
They may seem easy or obvious, but they all help so here we go...


Priming

As with priming your face, priming your eyes will almost act as a glue to keep everything in place.
My personal favourite is the Urban Decay Primer Potion. It comes in a few shades (but the original is best!)
I also love using long-wear cream shadows as a base because they can really add depth to your eyes. My fave is the Benefit Creaseless Cream Shadows. Particularly the shade 'Birthday Suit' as I must have gone through about 8 pots of the stuff! They're really nice to use just on their own as they all have a slight shimmer so they are an instant look.. The MAC Paint Pots are also great. I haven't tried the Maybelline Colour Tattoo ones, so I can't tell you what they're like, but I'm sure you can find a review somewhere ;) 

If you don't want to buy any of these products, you could always just use a light layer of concealer and a slight dusting of powder. It works, but I don't think it lasts as long and depending on the concealer, may still crease.


Eyeshadow

I don't think that eyeshadow is hugely responsible for long lasting makeup, but anyway, some minor things might help.

For example, if you layer up different layers and colours and textures, it will not only help your eyes look fab, it will make it stay on.. It will also help set your base a bit more too.
I also think that using a highly pigmented shadow will help.

Liner

Whether you use pencil, gel or liquid liner, by applying a shadow of the same colour on top, it will seal in the colour.
For pencil liner on your waterline, it will stop it bleeding out and making you look like Alice cooper. Waterproof eyeliners are obviously the best to use. I honestly don't know why they don't make all liners waterproof as they make ones that are very soft and easy to smudge if that's the look you want! It seems like an obvious thing to look for but whatever.. I would still set with eyeshadow just for an extra barrier.

My favourite is the Rimmel Exaggerate Waterproof Liner. But others that I like are the Soap and Glory ones and the YSL one. 

As for gel and liquid I love the MAC fluidline gel liner and the L'oreal Super Liner. 


Mascara

With mascara, again, waterproof is a must when looking for long-wear.
There are also some brands that do mascara primer, but quite often they are white and a tad clumpy so I'm not a massive fan. I find that just using waterproof works.

People say that you should do multiple coats of mascara, which is correct, but they say that you should let the first layer completely dry before applying the next layer. This is rubbish because if you put a fresh layer of mascara over a dry one, it will go clumpy, flakey and horrible, so I'd just let it dry a little bit so it's still sticky (I don't mean sticky but I can't think of the word.. You all know what I mean!)


So that's it for Volume II.. Volume III coming soon! 

Hope this helped!

Enjoy!

xo


Sunday 27 January 2013

Review: JASON Lips Bee Healthier Lip Balm


This product is AMAZING.
End of Post.

Just kidding! (About the end of post bit, the product really is amazing!)

I got this in the January Glossybox and I doubt that I will ever use anything else on my lips. It smells and tastes of 'After Eights' chocolates and makes my lips feel so soft and moisturised.

According to the Glossybox info sheet, the brand name means 'healer' in Greek, which I can see why! The product contains many ingredients that help moisturise and protect your lips against any chappiness (I'm not sure that's a word).

It uses cocoa butter, which protects lips from and injured and exposed skin and is how the chapped lips are cured, and shea butter, which reduces flakiness, gives a smooth experience and also, most importantly slows the loss of moisture by forming a barrier on the lips. It also contains UVA/UVB protection.

It doesn't feel greasy at all, and the main thing I love is that it last a really long time on my lips so I don't feel like I have to reapply it every 5 minutes.
Compared to vaseline, this is a million times better. I am not a huge fan of vaseline as it feels greasy and I don't think that it really adds any moisture to the lips. Plus, if you have a drink, it definitely doesn't last.

Another great thing about this lip balm is that it is only £1.99! Who knew that one of the best products I've ever used would be so cheap?

I haven't tried any more products by this brand but I am definitely going to, especially if they are as good as the lip balm!

You can get this at www.jasonnaturalcare.co.uk

Hope You Enjoyed!

xo